The first goal of any electrician or technician who works around live voltage is to go home safe. Traditionally voltage has been measured by attaching test lead probes or alligator clips directly to electrical conductors. This requires metal-to-metal contact that brings with it the risk of arc flash and potential harm to both the person doing the measuring and the equipment being measured.
Fluke FieldSense™ technology offers a safer way to measure voltage by isolating the measurement tool from the voltage source under test. This reduces the risk of electrical shock and arc flash. Through the principle of galvanic isolation FieldSense allows electricians and technicians to measure voltage without exposing themselves to contact points with live voltage. Instead, a FieldSense-enabled test tool such as the Fluke T6-1000 senses the electrical field in the open fork and measures the voltage through the cable insulation.
Commercial and light industrial electricians can use FieldSense-based devices for voltage and current measurements, verifying continuity values, and testing individual circuits. Here are the top five ways this non-contact voltage measurement technology can help you work safer:
1. No metal-to-metal contact when measuring ac voltage
In the past, measuring voltage has required metal-to-metal connection. You had to either attach probes or alligator clips to the conductor, which immediately put you at risk of spark or arc flash. Fluke FieldSense™ technology allows you to measure ac voltage, current, and frequency through the cable’s insulation by sliding the fork of the tester over the conductor. There is no direct electrical contact with live voltage so there’s much less potential for electrical shock or arc flash. You can work safer and faster.
FieldSense technology does require a capacitive path to earth ground which, with the T6 electrical tester, can be made in one of two ways. You can create a capacitive path to ground by first firmly inserting both test leads into the storage dock on the back of the tester, then placing your finger firmly on the ground touch point on the back of the battery cover. Next, slide the fork around the ac conductor. The second method is recommended if you are wearing safety gloves or are otherwise isolated from ground. In that case, you simply touch or clip the black test lead of the FieldSense tester to a grounded conductor such as a conduit or junction box.

2. Goes beyond detection to let you know how much voltage is present
There are a variety of devices that can detect whether voltage is present, ranging from pen style testers to clamp meters. FieldSense™ devices go way beyond those to show you not only that live voltage is present, but to accurately measure that voltage. FieldSense technology injects a known signal to accurately derive the unknown ac voltage. This produces an actual ac voltage measurement, unlike traditional non-contact voltage detectors that only detect if voltage is present. So, you now have voltage detection and a measurement in one step, with one tool.
3. Reduces the need to open panels because you can access wires at junction boxes
FieldSense-enabled devices don’t need access to wire end points so you can take a measurement at any point along the conductor. This makes it much easier to quickly measure ac voltage and current on traditionally inaccessible measurement points such as crowded junction boxes. All you have to do is slide a single conducting wire into the open fork, read the results, and you’re done in no time.
4. One-handed voltage measurements
Because FieldSense technology eliminates the need to fuss with test leads, in many cases, you can accurately measure voltage with one hand. The open fork form factor makes it easier to isolate individual hot and neutral wires, which in turn helps reduce the chance of accidental contact with another voltage point and the likelihood of errors. You’ll save time... and perhaps a lot more.

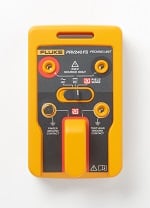
Fluke PRV240FS Proving Unit
5. Combines with proving unit to verify proper operation
A key requirement for any test tool, before you use it for live voltage tests, is to verify that it is working properly both before and after taking a measurement. And you want to be able to do that without unnecessary exposure to shock and arc flash. The PRV240FS proving unit sources 240V of steady-state ac and dc voltage to allow you to safely verify that your FieldSense™ electrical test tool is working properly before you conduct live tests. It’s a good practice to test your tester both before and after live tests, to ensure safer and more accurate measurements.
A final safety note
Even with the improved safety of FieldSense-enabled testers, workers should still wear appropriate personal protective equipment (PPE). Measuring without test leads does not mean you can skip wearing the required PPE. This means electricians should still wear arc-rated clothing and protective equipment including gloves, safety glasses or goggles, hearing protection and leather footwear as required.
In lower voltage areas, measurements can be taken wearing minimal PPE, including gloves and protective eyewear. A complete list of PPE categories, as defined by the National Fire Protection Association (NFPA) Standard 70E, are available in Table 130.7(C)(16). Greater electrical hazards require PPE with a higher arc rating that is able to withstand an arc-flash incident.

How to verify a T6 Electrical Tester with the PRV240FS
- Make sure your test leads are clipped securely into their slots on the back of the FieldSense tester.
- Slide the switch on the PRV240FS to FieldSense and insert the fork tester into the slot on the front of the proving unit.
- Ground the connection by pushing the grounding button on the back of the tester with one hand and pushing the button on the front of the PRV240FS with a finger on the other hand. Or ground it by inserting the black test lead into the hole on the lower right of the PRV240FS.
- If the tester is working properly you will see a green LED indicator on the proving unit and a voltage reading on the FieldSense tester.
- After running the live test, run the verification test again to confirm that the tester is still working properly.
source: Fluke


