Your Cart ()
cload

GUARANTEED SAFE & SECURE CHECKOUT

FREE Shipping For Purchases Over $250 within Australia

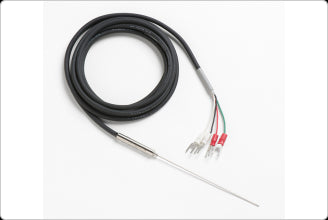
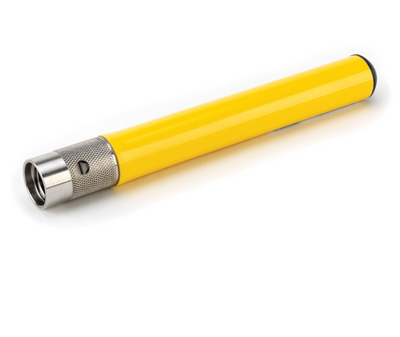
Fluke 5626 Secondary Standard PRTs, 100 OHM 1/4 IN DIA X 12 INCH

SKU: 3377055
£2,517.00
Checkout Secure
Need more info? Call us +61 8 9335 1718

(item no. 3377055)

PRODUCT OVERVIEW

High-temperature secondary standards

  • Range to 661°C
  • Meets all ITS-90 requirements for resistance ratios
  • Rtp drift < 20 mK after 500 hours at 661°C
  • Calibrated accuracy of ± 0.006 °C at 0 °C

Fluke Calibration's high-temp secondary standards fill the gap between affordable, but temperature-limited secondary PRTs (platinum resistance thermometers) and more expensive, highly accurate SPRTs (standard platinum resistance thermometers).

If you’re using block calibrators, furnaces, or temperature points above normal PRT (platinum resistance thermometer) temperatures (420 °C), then these two PRTs are for you. The Fluke 5626 is nominally 100 Ω and the 5628 (formerly Hart Scientific) is nominally 25.5 Ω. Both instruments have a temperature range of –200 °C to 661 °C. They make great working or check standards for calibration work up to the aluminum point.

Using a regular PRT at temperatures above 500 °C exposes the platinum to contamination. If the PRT is used as a reference or calibration standard, contamination is a major problem. SPRTs (standard platinum resistance thermometers), which are more expensive and delicate, can handle the higher temperatures, but with greater risk to the instrument due to shock, contamination, or mishandling. The 5626 and 5628 are designed to reduce the contamination risk through the use of internal protection while not impairing performance.

In addition to the right measurement performance and durability, a PRT for secondary applications should be priced affordably. Fluke Calibration’s new PRTs are inexpensive and come with an accredited calibration. The calibration comes complete with ITS-90 constants and a resistance-versus-temperature table.

Check the temperature range, check the stability, check the price! Who else gives you this much quality, performance, and value for your money? No one!


SPECIFICATIONS

Temperature Range 

–200 °C to 661 °C 

Handle Temp. 

0 °C to 80 °C 

RTPW 

5626: 100 Ω (± 1 Ω)
5628: 25.5 Ω (± 0.5 Ω) 

Resistance Ratio W(Ga)

W(302.9146K) ≥ 1.11807
α ≥ 0.003925

Calibrated Accuracy(k=2) 

± 0.006 °C at –200 °C
± 0.006 °C at 0 °C
± 0.015 °C at 420 °C
± 0.022 °C at 661 °C 

Stability 

5626: ± 0.003 °C
5628: ± 0.002 °C 

Long-Term Drift (k=2) 

5626:  < 0.006 °C/100 hours at 661 °C
5628: < 0.004 °C/100 hours at 661 °C 

Immersion 

At least 12.7 cm (5 in) recommended 

Sheath 

Inconel™ 600 

Lead Wires 

4-wire Super-Flex PVC, 22 AGW 

Termination 

Gold-plated spade lugs, or specify 

Size 

6.35 mm dia. x 305 mm,  381 mm,  or 508 mm (0.25 x 12, 15, or 20 in) standard, custom lengths available 

Calibration 

Accredited calibrations from Fluke Calibration

Includes calibration and 100 hr drift


Model Name Description
5626-12-X

Secondary Standard PRT (0.25 in dia x 12 in), 100 Ω, –200 °C to 661 °C

(17025 accredited calibration included. Traceable to NIST standards.)

X = termination. Specify “A" (INFO-CON for 914X), “B" (bare wire), “D" (5-pin DIN for Tweener Thermometers), “G" (gold pins), “J" (banana plugs), “L" (mini spade lugs), “M" (mini banana plugs), “P" (INFO-CON for 1523 or 1524), or “S" (spade lugs).

5626-15-X

Secondary Standard PRT (0.25 in dia x 15 in), 100 Ω, –200 °C to 661 °C

(17025 accredited calibration included. Traceable to NIST standards.)

X = termination. Specify “A" (INFO-CON for 914X), “B" (bare wire), “D" (5-pin DIN for Tweener Thermometers), “G" (gold pins), “J" (banana plugs), “L" (mini spade lugs), “M" (mini banana plugs), “P" (INFO-CON for 1523 or 1524), or “S" (spade lugs).

5626-20-X

High-temp PRT, 100 Ω, 508 mm (20 in) Includes case

(17025 accredited calibration included. Traceable to NIST standards.)

X = termination. Specify “A" (INFO-CON for 914X), “B" (bare wire), “D" (5-pin DIN for Tweener Thermometers), “G" (gold pins), “J" (banana plugs), “L" (mini spade lugs), “M" (mini banana plugs), “P" (INFO-CON for 1523 or 1524), or “S" (spade lugs).

5628-12-X

Secondary Standard PRT (0.25 in dia x 12 in), 25 Ω, –200 °C to 661 °C

(17025 accredited calibration included. Traceable to NIST standards.)

X = termination. Specify “A" (INFO-CON for 914X), “B" (bare wire), “D" (5-pin DIN for Tweener Thermometers), “G" (gold pins), “J" (banana plugs), “L" (mini spade lugs), “M" (mini banana plugs), “P" (INFO-CON for 1523 or 1524), or “S" (spade lugs).

5628-15-X

Secondary Standard PRT (0.25 in dia x 15 in), 25 Ω, –200 °C to 661 °C

(17025 accredited calibration included. Traceable to NIST standards.)

X = termination. Specify “A" (INFO-CON for 914X), “B" (bare wire), “D" (5-pin DIN for Tweener Thermometers), “G" (gold pins), “J" (banana plugs), “L" (mini spade lugs), “M" (mini banana plugs), “P" (INFO-CON for 1523 or 1524), or “S" (spade lugs).

5628-20-X

High-temp PRT, 25.5 Ω, 508 mm (20 in) Includes case

(17025 accredited calibration included. Traceable to NIST standards.)

X = termination. Specify “A" (INFO-CON for 914X), “B" (bare wire), “D" (5-pin DIN for Tweener Thermometers), “G" (gold pins), “J" (banana plugs), “L" (mini spade lugs), “M" (mini banana plugs), “P" (INFO-CON for 1523 or 1524), or “S" (spade lugs).

Accessories common to all models:

Accessory Description
2609

Probe Carrying Case, Plastic (for probes 635 mm [25 in] in length)


Product Manuals
application/pdf icon 5626/5628 Platinum Resistance Thermometer User’s Guide (438.46 KB)
application/pdf icon 5626/5628 Platinum Resistance Thermometer User’s Guide (rus) (507.61 KB)
Application Notes
application/pdf icon Calculating Calibration Uncertainties in an Automated Temperature Calibration System (426.88 KB)
application/pdf icon Establishment of a Secondary Temperature Calibration Laboratory (3.09 MB)
application/pdf icon How to Calibrate an RTD or Platinum Resistance Thermometer (PRT) (652.16 KB)
application/pdf icon Kalibrieren eines RTD oder Platin-Widerstandsthermometers (PRT) (German) (828.03 KB)
application/pdf icon Comment étalonner unde sonde RTD ou sonde à résistance de platine (PRT) (French) (834.22 KB)
application/pdf icon Cómo calibrar una RTD o un sensor de temperatura (Spanish) (819.7 KB)
application/pdf icon Industrial temperature readout and probe selection guide (2.33 MB)
application/pdf icon Anleitung zur Auswahl von Temperaturanzeigegeräten und Messfühlern für den Industrieeinsatz (German) (585.2 KB)
application/pdf icon Guide de sélection des afficheurs et sondes de températures industrielles (French) (584.47 KB)
application/pdf icon Guía para la elección de sonda y lectura de temperatura industrial (Spanish) (581.27 KB)
application/pdf icon Руководство по выбору промышленных показаний и зонда температуры (Russian) (686.56 KB)
application/pdf icon Guia de seleção de instrumento de leitura e sonda de temperatura industrial (Portuguese) (580.6 KB)
application/pdf icon 工业测温仪和探头选型指南 (Chinese) (253.92 KB)
application/pdf icon Temperature Calibration Equipment: A Technician's Guide (1.62 MB)
application/pdf icon Temperature measurement and calibration: What every instrument technician should know (1.65 MB)
application/pdf icon Temperaturmessung und -kalibrierung (German) (650.54 KB)
application/pdf icon Mesure et étalonnage thermique (French) (655.57 KB)
application/pdf icon Medición y calibración de temperatura (Spanish) (651.42 KB)
application/pdf icon English: Thermocouple App Notes Series, 1 of 4 - Thermocouple Fundamentals (2.5 MB)
application/pdf icon Korean: 열전대 응용시리즈 첫번째 - 열전대의 기본사항 (2.28 MB)
application/pdf icon German: Thermocouple App Notes Series, 1 of 4 - Grundlagen zu Thermoelementen (2.22 MB)
application/pdf icon French: Thermocouple App Notes Series, 1 of 4 - L'essentiel des thermocouples (2.22 MB)
application/pdf icon Spanish: Thermocouple App Notes Series, 1 of 4 - Nociones básicas de los termopares (2.22 MB)
application/pdf icon Russian: Thermocouple App Notes Series, 1 of 4 - Основные сведения о термопаре (2.29 MB)
application/pdf icon English: Thermocouple App Notes Series, 2 of 4 - How to Select Thermocouple Calibration Equipment (2.51 MB)
application/pdf icon German: Thermocouple App Notes Series, 2 of 4 - Auswahl von Geräten zur Kalibrierung von Thermoelementen (2.21 MB)
application/pdf icon French: Thermocouple App Notes Series, 2 of 4 - Guide de sélection d'équipement d'étalonnage de thermocouple (2.21 MB)
application/pdf icon Russian: Thermocouple App Notes Series, 2 of 4 - Как выбрать оборудование для калибровки термопары (2.26 MB)
application/pdf icon Spanish: Thermocouple App Notes Series, 2 of 4 - Cómo elegir un equipo de calibración de termopares (2.21 MB)
application/pdf icon Why Use a Triple Point of Water? (1.19 MB)
application/pdf icon Does Immersion Depth Really Matter? (745.44 KB)
Papers / Articles
application/pdf icon A High-Quality Platinum Resistance Thermometer to 661°C (85.57 KB)
application/pdf icon An Investigation of Long-Term Stability of a Precision Platinum Resistance Thermometer up to 660°C (164.52 KB)
application/pdf icon Fixed Points for Secondary Level and Industrial Calibration (496.68 KB)
application/pdf icon Fixed Points for Secondary Level Calibrations (560.12 KB)
I Just Got My Probe Recalibrated, Now What?
application/pdf icon Improving the Stability of Standard Platinum Resistance Thermometers (207.37 KB)
application/pdf icon Methods for Evaluating the Condition of Platinum Resistance Thermometers (130.23 KB)
Shipping This Item Ships from Fremantle, Perth, Western Australia
Please allow 2 - 10 days for your order to arrive.

Although Most Stocked Products will generally Ship Overnight. We source products from all over the world to bring you epic offers and the lowest prices. This means sometimes you have to wait a little longer to get your order but it's always worth it!

Returns are easy.

simply contact us for a returns number and send your item to our returns centre for fast processing. We'll get you a replacement or refund in a snap!

Description

(item no. 3377055)

PRODUCT OVERVIEW

High-temperature secondary standards

  • Range to 661°C
  • Meets all ITS-90 requirements for resistance ratios
  • Rtp drift < 20 mK after 500 hours at 661°C
  • Calibrated accuracy of ± 0.006 °C at 0 °C

Fluke Calibration's high-temp secondary standards fill the gap between affordable, but temperature-limited secondary PRTs (platinum resistance thermometers) and more expensive, highly accurate SPRTs (standard platinum resistance thermometers).

If you’re using block calibrators, furnaces, or temperature points above normal PRT (platinum resistance thermometer) temperatures (420 °C), then these two PRTs are for you. The Fluke 5626 is nominally 100 Ω and the 5628 (formerly Hart Scientific) is nominally 25.5 Ω. Both instruments have a temperature range of –200 °C to 661 °C. They make great working or check standards for calibration work up to the aluminum point.

Using a regular PRT at temperatures above 500 °C exposes the platinum to contamination. If the PRT is used as a reference or calibration standard, contamination is a major problem. SPRTs (standard platinum resistance thermometers), which are more expensive and delicate, can handle the higher temperatures, but with greater risk to the instrument due to shock, contamination, or mishandling. The 5626 and 5628 are designed to reduce the contamination risk through the use of internal protection while not impairing performance.

In addition to the right measurement performance and durability, a PRT for secondary applications should be priced affordably. Fluke Calibration’s new PRTs are inexpensive and come with an accredited calibration. The calibration comes complete with ITS-90 constants and a resistance-versus-temperature table.

Check the temperature range, check the stability, check the price! Who else gives you this much quality, performance, and value for your money? No one!


SPECIFICATIONS

Temperature Range 

–200 °C to 661 °C 

Handle Temp. 

0 °C to 80 °C 

RTPW 

5626: 100 Ω (± 1 Ω)
5628: 25.5 Ω (± 0.5 Ω) 

Resistance Ratio W(Ga)

W(302.9146K) ≥ 1.11807
α ≥ 0.003925

Calibrated Accuracy(k=2) 

± 0.006 °C at –200 °C
± 0.006 °C at 0 °C
± 0.015 °C at 420 °C
± 0.022 °C at 661 °C 

Stability 

5626: ± 0.003 °C
5628: ± 0.002 °C 

Long-Term Drift (k=2) 

5626:  < 0.006 °C/100 hours at 661 °C
5628: < 0.004 °C/100 hours at 661 °C 

Immersion 

At least 12.7 cm (5 in) recommended 

Sheath 

Inconel™ 600 

Lead Wires 

4-wire Super-Flex PVC, 22 AGW 

Termination 

Gold-plated spade lugs, or specify 

Size 

6.35 mm dia. x 305 mm,  381 mm,  or 508 mm (0.25 x 12, 15, or 20 in) standard, custom lengths available 

Calibration 

Accredited calibrations from Fluke Calibration

Includes calibration and 100 hr drift


Model Name Description
5626-12-X

Secondary Standard PRT (0.25 in dia x 12 in), 100 Ω, –200 °C to 661 °C

(17025 accredited calibration included. Traceable to NIST standards.)

X = termination. Specify “A" (INFO-CON for 914X), “B" (bare wire), “D" (5-pin DIN for Tweener Thermometers), “G" (gold pins), “J" (banana plugs), “L" (mini spade lugs), “M" (mini banana plugs), “P" (INFO-CON for 1523 or 1524), or “S" (spade lugs).

5626-15-X

Secondary Standard PRT (0.25 in dia x 15 in), 100 Ω, –200 °C to 661 °C

(17025 accredited calibration included. Traceable to NIST standards.)

X = termination. Specify “A" (INFO-CON for 914X), “B" (bare wire), “D" (5-pin DIN for Tweener Thermometers), “G" (gold pins), “J" (banana plugs), “L" (mini spade lugs), “M" (mini banana plugs), “P" (INFO-CON for 1523 or 1524), or “S" (spade lugs).

5626-20-X

High-temp PRT, 100 Ω, 508 mm (20 in) Includes case

(17025 accredited calibration included. Traceable to NIST standards.)

X = termination. Specify “A" (INFO-CON for 914X), “B" (bare wire), “D" (5-pin DIN for Tweener Thermometers), “G" (gold pins), “J" (banana plugs), “L" (mini spade lugs), “M" (mini banana plugs), “P" (INFO-CON for 1523 or 1524), or “S" (spade lugs).

5628-12-X

Secondary Standard PRT (0.25 in dia x 12 in), 25 Ω, –200 °C to 661 °C

(17025 accredited calibration included. Traceable to NIST standards.)

X = termination. Specify “A" (INFO-CON for 914X), “B" (bare wire), “D" (5-pin DIN for Tweener Thermometers), “G" (gold pins), “J" (banana plugs), “L" (mini spade lugs), “M" (mini banana plugs), “P" (INFO-CON for 1523 or 1524), or “S" (spade lugs).

5628-15-X

Secondary Standard PRT (0.25 in dia x 15 in), 25 Ω, –200 °C to 661 °C

(17025 accredited calibration included. Traceable to NIST standards.)

X = termination. Specify “A" (INFO-CON for 914X), “B" (bare wire), “D" (5-pin DIN for Tweener Thermometers), “G" (gold pins), “J" (banana plugs), “L" (mini spade lugs), “M" (mini banana plugs), “P" (INFO-CON for 1523 or 1524), or “S" (spade lugs).

5628-20-X

High-temp PRT, 25.5 Ω, 508 mm (20 in) Includes case

(17025 accredited calibration included. Traceable to NIST standards.)

X = termination. Specify “A" (INFO-CON for 914X), “B" (bare wire), “D" (5-pin DIN for Tweener Thermometers), “G" (gold pins), “J" (banana plugs), “L" (mini spade lugs), “M" (mini banana plugs), “P" (INFO-CON for 1523 or 1524), or “S" (spade lugs).

Accessories common to all models:

Accessory Description
2609

Probe Carrying Case, Plastic (for probes 635 mm [25 in] in length)


Product Manuals
application/pdf icon 5626/5628 Platinum Resistance Thermometer User’s Guide (438.46 KB)
application/pdf icon 5626/5628 Platinum Resistance Thermometer User’s Guide (rus) (507.61 KB)
Application Notes
application/pdf icon Calculating Calibration Uncertainties in an Automated Temperature Calibration System (426.88 KB)
application/pdf icon Establishment of a Secondary Temperature Calibration Laboratory (3.09 MB)
application/pdf icon How to Calibrate an RTD or Platinum Resistance Thermometer (PRT) (652.16 KB)
application/pdf icon Kalibrieren eines RTD oder Platin-Widerstandsthermometers (PRT) (German) (828.03 KB)
application/pdf icon Comment étalonner unde sonde RTD ou sonde à résistance de platine (PRT) (French) (834.22 KB)
application/pdf icon Cómo calibrar una RTD o un sensor de temperatura (Spanish) (819.7 KB)
application/pdf icon Industrial temperature readout and probe selection guide (2.33 MB)
application/pdf icon Anleitung zur Auswahl von Temperaturanzeigegeräten und Messfühlern für den Industrieeinsatz (German) (585.2 KB)
application/pdf icon Guide de sélection des afficheurs et sondes de températures industrielles (French) (584.47 KB)
application/pdf icon Guía para la elección de sonda y lectura de temperatura industrial (Spanish) (581.27 KB)
application/pdf icon Руководство по выбору промышленных показаний и зонда температуры (Russian) (686.56 KB)
application/pdf icon Guia de seleção de instrumento de leitura e sonda de temperatura industrial (Portuguese) (580.6 KB)
application/pdf icon 工业测温仪和探头选型指南 (Chinese) (253.92 KB)
application/pdf icon Temperature Calibration Equipment: A Technician's Guide (1.62 MB)
application/pdf icon Temperature measurement and calibration: What every instrument technician should know (1.65 MB)
application/pdf icon Temperaturmessung und -kalibrierung (German) (650.54 KB)
application/pdf icon Mesure et étalonnage thermique (French) (655.57 KB)
application/pdf icon Medición y calibración de temperatura (Spanish) (651.42 KB)
application/pdf icon English: Thermocouple App Notes Series, 1 of 4 - Thermocouple Fundamentals (2.5 MB)
application/pdf icon Korean: 열전대 응용시리즈 첫번째 - 열전대의 기본사항 (2.28 MB)
application/pdf icon German: Thermocouple App Notes Series, 1 of 4 - Grundlagen zu Thermoelementen (2.22 MB)
application/pdf icon French: Thermocouple App Notes Series, 1 of 4 - L'essentiel des thermocouples (2.22 MB)
application/pdf icon Spanish: Thermocouple App Notes Series, 1 of 4 - Nociones básicas de los termopares (2.22 MB)
application/pdf icon Russian: Thermocouple App Notes Series, 1 of 4 - Основные сведения о термопаре (2.29 MB)
application/pdf icon English: Thermocouple App Notes Series, 2 of 4 - How to Select Thermocouple Calibration Equipment (2.51 MB)
application/pdf icon German: Thermocouple App Notes Series, 2 of 4 - Auswahl von Geräten zur Kalibrierung von Thermoelementen (2.21 MB)
application/pdf icon French: Thermocouple App Notes Series, 2 of 4 - Guide de sélection d'équipement d'étalonnage de thermocouple (2.21 MB)
application/pdf icon Russian: Thermocouple App Notes Series, 2 of 4 - Как выбрать оборудование для калибровки термопары (2.26 MB)
application/pdf icon Spanish: Thermocouple App Notes Series, 2 of 4 - Cómo elegir un equipo de calibración de termopares (2.21 MB)
application/pdf icon Why Use a Triple Point of Water? (1.19 MB)
application/pdf icon Does Immersion Depth Really Matter? (745.44 KB)
Papers / Articles
application/pdf icon A High-Quality Platinum Resistance Thermometer to 661°C (85.57 KB)
application/pdf icon An Investigation of Long-Term Stability of a Precision Platinum Resistance Thermometer up to 660°C (164.52 KB)
application/pdf icon Fixed Points for Secondary Level and Industrial Calibration (496.68 KB)
application/pdf icon Fixed Points for Secondary Level Calibrations (560.12 KB)
I Just Got My Probe Recalibrated, Now What?
application/pdf icon Improving the Stability of Standard Platinum Resistance Thermometers (207.37 KB)
application/pdf icon Methods for Evaluating the Condition of Platinum Resistance Thermometers (130.23 KB)

Shipping

Shipping This item ships to

Delivery & Returns

Please allow 2 - 10 days for your order to arrive.

Although Most Stocked Products will generally Ship Overnight. We source products from all over the world to bring you epic offers and the lowest prices. This means sometimes you have to wait a little longer to get your order but it's always worth it!

Returns are easy.

simply contact us for a returns number and send your item to our returns centre for fast processing. We'll get you a replacement or refund in a snap!

Reviews

6 Great reasons to buy from us:

  • Image of If your product is faulty or damaged under manufacture warranty, simply send it back to us and we'll cheerfully replace it or fix the problem for you.

    30 Days Return

    If your product is faulty or damaged under manufacture warranty, simply send it back to us and we'll cheerfully replace it or fix the problem for you.
  • Image of Simply contact us for a returns number and send your item to our returns centre for fast processing. We'll get you a replacement or refund in a snap!

    Returns are Easy

    Simply contact us for a returns number and send your item to our returns centre for fast processing. We'll get you a replacement or refund in a snap!
  • Image of In the unlikely event that you find your item cheaper at another online store, just let us know and we'll beat the competitor's pricing hands-down.

    Best Price Guarantee

    In the unlikely event that you find your item cheaper at another online store, just let us know and we'll beat the competitor's pricing hands-down.
  • Image of We insist that you love everything you buy from us. If you're unhappy for any reason whatsoever, just let us know and we'll bend over backwards to make things right again.

    We guarantee your satisfaction

    We insist that you love everything you buy from us. If you're unhappy for any reason whatsoever, just let us know and we'll bend over backwards to make things right again.
  • Image of Ordering from Laserman Technologies is 100% safe and secure so you can rest easy. Your personal details are never shared, sold or rented to anyone either.

    100% Safe & Secure

    Ordering from Laserman Technologies is 100% safe and secure so you can rest easy. Your personal details are never shared, sold or rented to anyone either.
  • Image of Laserman the Best Laser Level, Pipe Laser and Laser Measuring Warranties in the Business - Now thats unbeatable value !!.

    Best Laser Warranties in the Business

    Laserman the Best Laser Level, Pipe Laser and Laser Measuring Warranties in the Business - Now thats unbeatable value !!.
Fluke 5626 Secondary Standard PRTs, 100 OHM 1/4 IN DIA X 12 INCH

Fluke 5626 Secondary Standard PRTs, 100 OHM 1/4 IN DIA X 12 INCH

£2,517.00
Fluke 5626 Secondary Standard PRTs, 100 OHM 1/4 IN DIA X 12 INCH

Fluke 5626 Secondary Standard PRTs, 100 OHM 1/4 IN DIA X 12 INCH

£2,517.00

Recently viewed products