Your Cart ()
cload

GUARANTEED SAFE & SECURE CHECKOUT

FREE Shipping For Purchases Over $250 within Australia

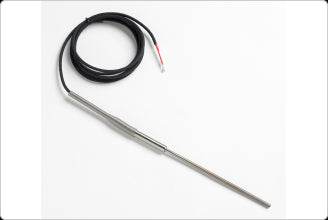
Fluke 5627A Precision Thermometer, RTD Temperature Probe

SKU: 4565487
£1,194.00
Checkout Secure
Need more info? Call us +61 8 9335 1718

(item no. 4565487)

Durable RTDs (PRTs) with temperature range to 420 °C and accuracy to 0.025 °C

  • Vibration and shock resistant
  • NVLAP-accredited calibration included, lab code 200706-0

When buying a PRT or RTD temperature probe, performance isn’t the only criterion you need to look at. The real issues are price-to-accuracy and price-to-durability ratios.

5627A probes have a temperature range up to 420 °C and an accuracy as good as ± 0.025 °C. They come in three different lengths. (Both six- and nine-inch models cover –200 °C to 300 °C.) Each precision thermometer is shipped with its ITS-90 coefficients and a calibration table in 1 °C increments.

One of the best features of this RTD sensor is that it conforms to the standard 385 curve, letting you use your DIN/IEC RTD meters fully. Why use a precision thermometer or RTD temperature probe that’s less accurate than your meter?

The 5627A is manufactured using a coil suspension element design for increased shock and vibration resistance. It has a mineral-insulated sheath with a minimum bend radius of 19 mm (3/4-inch) for flexibility and durability. (Bend, if any, should be specified at time of order.)

Six- and nine-inch 5627A precision thermometers are calibrated at –196 °C, –38 °C, 0 °C, 200 °C, and 300 °C. For 12-inch versions of these precision thermometers, the point at 300 °C is replaced by a calibration point at 420 °C.

Each probe is individually calibrated and includes a NVLAP-accredited report of calibration from the manufacturer, lab code 200706-0.

This RTD temperature probe is an excellent value for a precision thermometer. It has the price-to-accuracy and price-to-durability ratios you should demand in all of the precision thermometers you buy!

Specifications

Resistance Nominal 100 Ω
Temperature Coefficient 0.00385 Ω/Ω/ °C nominal
Temperature Range −200 °C to 420 °C (5627A-6 and 5627A-9 to 300 °C; transition and cable temperature: 0 °C to 150 °C)
Drift Rate (k=2) ± 0.04 °C at 0 °C after 100 hours at 420 °C
Sheath Material 316 Stainless Steel
Leads PTFE-insulated, nickel-plated stranded copper, 22 AWG
Termination Specify. See Ordering Information.
Time Constant Four seconds maximum for 63.2 % response to step change in water moving at 3 fps.
Bending Radius Sheath may be ordered with a bend on a minimum radius of 19 mm (3/4 in) except for 50 mm (2 in) area of sheath near tip. (Fluke lab requires 20 cm [8 in] of unbent sheath to re-calibrate.)
Calibration Includes manufacturer's NVLAP-accredited (lab code 200706-0) calibration and table with R vs. T values in 1 °C increments from -196 °C to 500 °C (to 300 °C for 5627A-6 and 5627A-9).
ITS-90 coefficients included.
Immersion At least 100 mm (4 in) recommended
Calibrated Accuracy† (k=2) ± 0.026 °C at -196 °C
± 0.046 °C at 0 °C
± 0.077 °C at 200 °C
± 0.124 °C at 420 °C
Size 5627A-12: 305 mm x 6.35 mm (12 in x 1/4 in)
5627A-9: 229 mm x 4.7 mm (9 in x 3/16 in)
5627A-6: 152 mm x 4.7 mm (6 in x 3/16 in)
†Includes calibration uncertainty and 100 hr drift.


Model Name Description
5627A-6-X

Secondary PRT, 152 mm x 4.7 mm (6 x 3/16 in), –200 °C to 300 °C

(17025 accredited calibration included. Traceable to NIST standards.)

X = termination. Specify “A" (INFO-CON for 914X), “B" (bare wire), “D" (5-pin DIN for Tweener Thermometers), “G" (gold pins), “J" (banana plugs), “L" (mini spade lugs), “M" (mini banana plugs), “P" (INFO-CON for 1523 or 1524), or “S" (spade lugs).

5627A-9-X

Secondary PRT, 229 mm x 4.7 mm (9 x 3/16 in), –200 °C to 300 °C

(17025 accredited calibration included. Traceable to NIST standards.)

X = termination. Specify “A" (INFO-CON for 914X), “B" (bare wire), “D" (5-pin DIN for Tweener Thermometers), “G" (gold pins), “J" (banana plugs), “L" (mini spade lugs), “M" (mini banana plugs), “P" (INFO-CON for 1523 or 1524), or “S" (spade lugs).

5627A-12-X

Secondary PRT, 305 mm x 6.35 mm (12 x 1/4 in), –200 °C to 420 °C

(17025 accredited calibration included. Traceable to NIST standards.)

X = termination. Specify “A" (INFO-CON for 914X), “B" (bare wire), “D" (5-pin DIN for Tweener Thermometers), “G" (gold pins), “J" (banana plugs), “L" (mini spade lugs), “M" (mini banana plugs), “P" (INFO-CON for 1523 or 1524), or “S" (spade lugs).

Accessories common to all models:

Accessory Description
2601

Probe Carrying Case, Plastic 

2609

Probe Carrying Case, Plastic (for probes 635 mm [25 in] in length)


Product Manuals
application/pdf icon 5627A Platinum Resistance Thermometer User’s Guide (English) (111.79 KB)
Application Notes
application/pdf icon How to Calibrate an RTD or Platinum Resistance Thermometer (PRT) (652.16 KB)
application/pdf icon Kalibrieren eines RTD oder Platin-Widerstandsthermometers (PRT) (German) (828.03 KB)
application/pdf icon Comment étalonner unde sonde RTD ou sonde à résistance de platine (PRT) (French) (834.22 KB)
application/pdf icon Cómo calibrar una RTD o un sensor de temperatura (Spanish) (819.7 KB)
application/pdf icon Industrial temperature readout and probe selection guide (2.33 MB)
application/pdf icon Anleitung zur Auswahl von Temperaturanzeigegeräten und Messfühlern für den Industrieeinsatz (German) (585.2 KB)
application/pdf icon Guide de sélection des afficheurs et sondes de températures industrielles (French) (584.47 KB)
application/pdf icon Guía para la elección de sonda y lectura de temperatura industrial (Spanish) (581.27 KB)
application/pdf icon Руководство по выбору промышленных показаний и зонда температуры (Russian) (686.56 KB)
application/pdf icon Guia de seleção de instrumento de leitura e sonda de temperatura industrial (Portuguese) (580.6 KB)
application/pdf icon 工业测温仪和探头选型指南 (Chinese) (253.92 KB)
application/pdf icon Temperature Calibration Equipment: A Technician's Guide (1.62 MB)
application/pdf icon Temperature measurement and calibration: What every instrument technician should know (1.65 MB)
application/pdf icon Temperaturmessung und -kalibrierung (German) (650.54 KB)
application/pdf icon Mesure et étalonnage thermique (French) (655.57 KB)
application/pdf icon Medición y calibración de temperatura (Spanish) (651.42 KB)
application/pdf icon English: Thermocouple App Notes Series, 1 of 4 - Thermocouple Fundamentals (2.5 MB)
application/pdf icon Korean: 열전대 응용시리즈 첫번째 - 열전대의 기본사항 (2.28 MB)
application/pdf icon German: Thermocouple App Notes Series, 1 of 4 - Grundlagen zu Thermoelementen (2.22 MB)
application/pdf icon French: Thermocouple App Notes Series, 1 of 4 - L'essentiel des thermocouples (2.22 MB)
application/pdf icon Spanish: Thermocouple App Notes Series, 1 of 4 - Nociones básicas de los termopares (2.22 MB)
application/pdf icon Russian: Thermocouple App Notes Series, 1 of 4 - Основные сведения о термопаре (2.29 MB)
application/pdf icon English: Thermocouple App Notes Series, 2 of 4 - How to Select Thermocouple Calibration Equipment (2.51 MB)
application/pdf icon German: Thermocouple App Notes Series, 2 of 4 - Auswahl von Geräten zur Kalibrierung von Thermoelementen (2.21 MB)
application/pdf icon French: Thermocouple App Notes Series, 2 of 4 - Guide de sélection d'équipement d'étalonnage de thermocouple (2.21 MB)
application/pdf icon Russian: Thermocouple App Notes Series, 2 of 4 - Как выбрать оборудование для калибровки термопары (2.26 MB)
application/pdf icon Spanish: Thermocouple App Notes Series, 2 of 4 - Cómo elegir un equipo de calibración de termopares (2.21 MB)
application/pdf icon Does Immersion Depth Really Matter? (745.44 KB)
Papers / Articles
application/pdf icon An Investigation into the Stability of Industrial Platinum Resistance Thermometers (262.44 KB)
I Just Got My Probe Recalibrated, Now What?
application/pdf icon Methods for Evaluating the Condition of Platinum Resistance Thermometers (130.23 KB)
Platinum Resistance Thermometers (PRT)
application/pdf icon Proper Platinum Resistance Thermometer Calibration Uncertainty Analysis (351.32 KB)
On-Demand Webinars
Overcoming Drift: Tips to Maintaining Your PRTs


Shipping This Item Ships from Fremantle, Perth, Western Australia
Please allow 2 - 10 days for your order to arrive.

Although Most Stocked Products will generally Ship Overnight. We source products from all over the world to bring you epic offers and the lowest prices. This means sometimes you have to wait a little longer to get your order but it's always worth it!

Returns are easy.

simply contact us for a returns number and send your item to our returns centre for fast processing. We'll get you a replacement or refund in a snap!

Description

(item no. 4565487)

Durable RTDs (PRTs) with temperature range to 420 °C and accuracy to 0.025 °C

  • Vibration and shock resistant
  • NVLAP-accredited calibration included, lab code 200706-0

When buying a PRT or RTD temperature probe, performance isn’t the only criterion you need to look at. The real issues are price-to-accuracy and price-to-durability ratios.

5627A probes have a temperature range up to 420 °C and an accuracy as good as ± 0.025 °C. They come in three different lengths. (Both six- and nine-inch models cover –200 °C to 300 °C.) Each precision thermometer is shipped with its ITS-90 coefficients and a calibration table in 1 °C increments.

One of the best features of this RTD sensor is that it conforms to the standard 385 curve, letting you use your DIN/IEC RTD meters fully. Why use a precision thermometer or RTD temperature probe that’s less accurate than your meter?

The 5627A is manufactured using a coil suspension element design for increased shock and vibration resistance. It has a mineral-insulated sheath with a minimum bend radius of 19 mm (3/4-inch) for flexibility and durability. (Bend, if any, should be specified at time of order.)

Six- and nine-inch 5627A precision thermometers are calibrated at –196 °C, –38 °C, 0 °C, 200 °C, and 300 °C. For 12-inch versions of these precision thermometers, the point at 300 °C is replaced by a calibration point at 420 °C.

Each probe is individually calibrated and includes a NVLAP-accredited report of calibration from the manufacturer, lab code 200706-0.

This RTD temperature probe is an excellent value for a precision thermometer. It has the price-to-accuracy and price-to-durability ratios you should demand in all of the precision thermometers you buy!

Specifications

Resistance Nominal 100 Ω
Temperature Coefficient 0.00385 Ω/Ω/ °C nominal
Temperature Range −200 °C to 420 °C (5627A-6 and 5627A-9 to 300 °C; transition and cable temperature: 0 °C to 150 °C)
Drift Rate (k=2) ± 0.04 °C at 0 °C after 100 hours at 420 °C
Sheath Material 316 Stainless Steel
Leads PTFE-insulated, nickel-plated stranded copper, 22 AWG
Termination Specify. See Ordering Information.
Time Constant Four seconds maximum for 63.2 % response to step change in water moving at 3 fps.
Bending Radius Sheath may be ordered with a bend on a minimum radius of 19 mm (3/4 in) except for 50 mm (2 in) area of sheath near tip. (Fluke lab requires 20 cm [8 in] of unbent sheath to re-calibrate.)
Calibration Includes manufacturer's NVLAP-accredited (lab code 200706-0) calibration and table with R vs. T values in 1 °C increments from -196 °C to 500 °C (to 300 °C for 5627A-6 and 5627A-9).
ITS-90 coefficients included.
Immersion At least 100 mm (4 in) recommended
Calibrated Accuracy† (k=2) ± 0.026 °C at -196 °C
± 0.046 °C at 0 °C
± 0.077 °C at 200 °C
± 0.124 °C at 420 °C
Size 5627A-12: 305 mm x 6.35 mm (12 in x 1/4 in)
5627A-9: 229 mm x 4.7 mm (9 in x 3/16 in)
5627A-6: 152 mm x 4.7 mm (6 in x 3/16 in)
†Includes calibration uncertainty and 100 hr drift.


Model Name Description
5627A-6-X

Secondary PRT, 152 mm x 4.7 mm (6 x 3/16 in), –200 °C to 300 °C

(17025 accredited calibration included. Traceable to NIST standards.)

X = termination. Specify “A" (INFO-CON for 914X), “B" (bare wire), “D" (5-pin DIN for Tweener Thermometers), “G" (gold pins), “J" (banana plugs), “L" (mini spade lugs), “M" (mini banana plugs), “P" (INFO-CON for 1523 or 1524), or “S" (spade lugs).

5627A-9-X

Secondary PRT, 229 mm x 4.7 mm (9 x 3/16 in), –200 °C to 300 °C

(17025 accredited calibration included. Traceable to NIST standards.)

X = termination. Specify “A" (INFO-CON for 914X), “B" (bare wire), “D" (5-pin DIN for Tweener Thermometers), “G" (gold pins), “J" (banana plugs), “L" (mini spade lugs), “M" (mini banana plugs), “P" (INFO-CON for 1523 or 1524), or “S" (spade lugs).

5627A-12-X

Secondary PRT, 305 mm x 6.35 mm (12 x 1/4 in), –200 °C to 420 °C

(17025 accredited calibration included. Traceable to NIST standards.)

X = termination. Specify “A" (INFO-CON for 914X), “B" (bare wire), “D" (5-pin DIN for Tweener Thermometers), “G" (gold pins), “J" (banana plugs), “L" (mini spade lugs), “M" (mini banana plugs), “P" (INFO-CON for 1523 or 1524), or “S" (spade lugs).

Accessories common to all models:

Accessory Description
2601

Probe Carrying Case, Plastic 

2609

Probe Carrying Case, Plastic (for probes 635 mm [25 in] in length)


Product Manuals
application/pdf icon 5627A Platinum Resistance Thermometer User’s Guide (English) (111.79 KB)
Application Notes
application/pdf icon How to Calibrate an RTD or Platinum Resistance Thermometer (PRT) (652.16 KB)
application/pdf icon Kalibrieren eines RTD oder Platin-Widerstandsthermometers (PRT) (German) (828.03 KB)
application/pdf icon Comment étalonner unde sonde RTD ou sonde à résistance de platine (PRT) (French) (834.22 KB)
application/pdf icon Cómo calibrar una RTD o un sensor de temperatura (Spanish) (819.7 KB)
application/pdf icon Industrial temperature readout and probe selection guide (2.33 MB)
application/pdf icon Anleitung zur Auswahl von Temperaturanzeigegeräten und Messfühlern für den Industrieeinsatz (German) (585.2 KB)
application/pdf icon Guide de sélection des afficheurs et sondes de températures industrielles (French) (584.47 KB)
application/pdf icon Guía para la elección de sonda y lectura de temperatura industrial (Spanish) (581.27 KB)
application/pdf icon Руководство по выбору промышленных показаний и зонда температуры (Russian) (686.56 KB)
application/pdf icon Guia de seleção de instrumento de leitura e sonda de temperatura industrial (Portuguese) (580.6 KB)
application/pdf icon 工业测温仪和探头选型指南 (Chinese) (253.92 KB)
application/pdf icon Temperature Calibration Equipment: A Technician's Guide (1.62 MB)
application/pdf icon Temperature measurement and calibration: What every instrument technician should know (1.65 MB)
application/pdf icon Temperaturmessung und -kalibrierung (German) (650.54 KB)
application/pdf icon Mesure et étalonnage thermique (French) (655.57 KB)
application/pdf icon Medición y calibración de temperatura (Spanish) (651.42 KB)
application/pdf icon English: Thermocouple App Notes Series, 1 of 4 - Thermocouple Fundamentals (2.5 MB)
application/pdf icon Korean: 열전대 응용시리즈 첫번째 - 열전대의 기본사항 (2.28 MB)
application/pdf icon German: Thermocouple App Notes Series, 1 of 4 - Grundlagen zu Thermoelementen (2.22 MB)
application/pdf icon French: Thermocouple App Notes Series, 1 of 4 - L'essentiel des thermocouples (2.22 MB)
application/pdf icon Spanish: Thermocouple App Notes Series, 1 of 4 - Nociones básicas de los termopares (2.22 MB)
application/pdf icon Russian: Thermocouple App Notes Series, 1 of 4 - Основные сведения о термопаре (2.29 MB)
application/pdf icon English: Thermocouple App Notes Series, 2 of 4 - How to Select Thermocouple Calibration Equipment (2.51 MB)
application/pdf icon German: Thermocouple App Notes Series, 2 of 4 - Auswahl von Geräten zur Kalibrierung von Thermoelementen (2.21 MB)
application/pdf icon French: Thermocouple App Notes Series, 2 of 4 - Guide de sélection d'équipement d'étalonnage de thermocouple (2.21 MB)
application/pdf icon Russian: Thermocouple App Notes Series, 2 of 4 - Как выбрать оборудование для калибровки термопары (2.26 MB)
application/pdf icon Spanish: Thermocouple App Notes Series, 2 of 4 - Cómo elegir un equipo de calibración de termopares (2.21 MB)
application/pdf icon Does Immersion Depth Really Matter? (745.44 KB)
Papers / Articles
application/pdf icon An Investigation into the Stability of Industrial Platinum Resistance Thermometers (262.44 KB)
I Just Got My Probe Recalibrated, Now What?
application/pdf icon Methods for Evaluating the Condition of Platinum Resistance Thermometers (130.23 KB)
Platinum Resistance Thermometers (PRT)
application/pdf icon Proper Platinum Resistance Thermometer Calibration Uncertainty Analysis (351.32 KB)
On-Demand Webinars
Overcoming Drift: Tips to Maintaining Your PRTs


Shipping

Shipping This item ships to

Delivery & Returns

Please allow 2 - 10 days for your order to arrive.

Although Most Stocked Products will generally Ship Overnight. We source products from all over the world to bring you epic offers and the lowest prices. This means sometimes you have to wait a little longer to get your order but it's always worth it!

Returns are easy.

simply contact us for a returns number and send your item to our returns centre for fast processing. We'll get you a replacement or refund in a snap!

Reviews

6 Great reasons to buy from us:

  • Image of If your product is faulty or damaged under manufacture warranty, simply send it back to us and we'll cheerfully replace it or fix the problem for you.

    30 Days Return

    If your product is faulty or damaged under manufacture warranty, simply send it back to us and we'll cheerfully replace it or fix the problem for you.
  • Image of Simply contact us for a returns number and send your item to our returns centre for fast processing. We'll get you a replacement or refund in a snap!

    Returns are Easy

    Simply contact us for a returns number and send your item to our returns centre for fast processing. We'll get you a replacement or refund in a snap!
  • Image of In the unlikely event that you find your item cheaper at another online store, just let us know and we'll beat the competitor's pricing hands-down.

    Best Price Guarantee

    In the unlikely event that you find your item cheaper at another online store, just let us know and we'll beat the competitor's pricing hands-down.
  • Image of We insist that you love everything you buy from us. If you're unhappy for any reason whatsoever, just let us know and we'll bend over backwards to make things right again.

    We guarantee your satisfaction

    We insist that you love everything you buy from us. If you're unhappy for any reason whatsoever, just let us know and we'll bend over backwards to make things right again.
  • Image of Ordering from Laserman Technologies is 100% safe and secure so you can rest easy. Your personal details are never shared, sold or rented to anyone either.

    100% Safe & Secure

    Ordering from Laserman Technologies is 100% safe and secure so you can rest easy. Your personal details are never shared, sold or rented to anyone either.
  • Image of Laserman the Best Laser Level, Pipe Laser and Laser Measuring Warranties in the Business - Now thats unbeatable value !!.

    Best Laser Warranties in the Business

    Laserman the Best Laser Level, Pipe Laser and Laser Measuring Warranties in the Business - Now thats unbeatable value !!.
Fluke 5627A Precision Thermometer, RTD Temperature Probe

Fluke 5627A Precision Thermometer, RTD Temperature Probe

£1,194.00
Fluke 5627A Precision Thermometer, RTD Temperature Probe

Fluke 5627A Precision Thermometer, RTD Temperature Probe

£1,194.00

Recently viewed products